# TLS/SSL Configuration Options
The CMDB-360 Base Station requires web traffic to be encrypted using TLS/SSL Certificates. You may configure this encryption using two approaches:
- Option 1 (preferred): By utilizing a capable load balancer as an intermediary to terminate TLS/SSL connections and decrypting the traffic that forwards to the CMDB-360 Base Station
- Option 2: By allowing the CMDB-360 Base Station server to terminate and decrypt the traffic directly using a local certificate on the server
Below is a representation of how these options may be deployed on OCI:
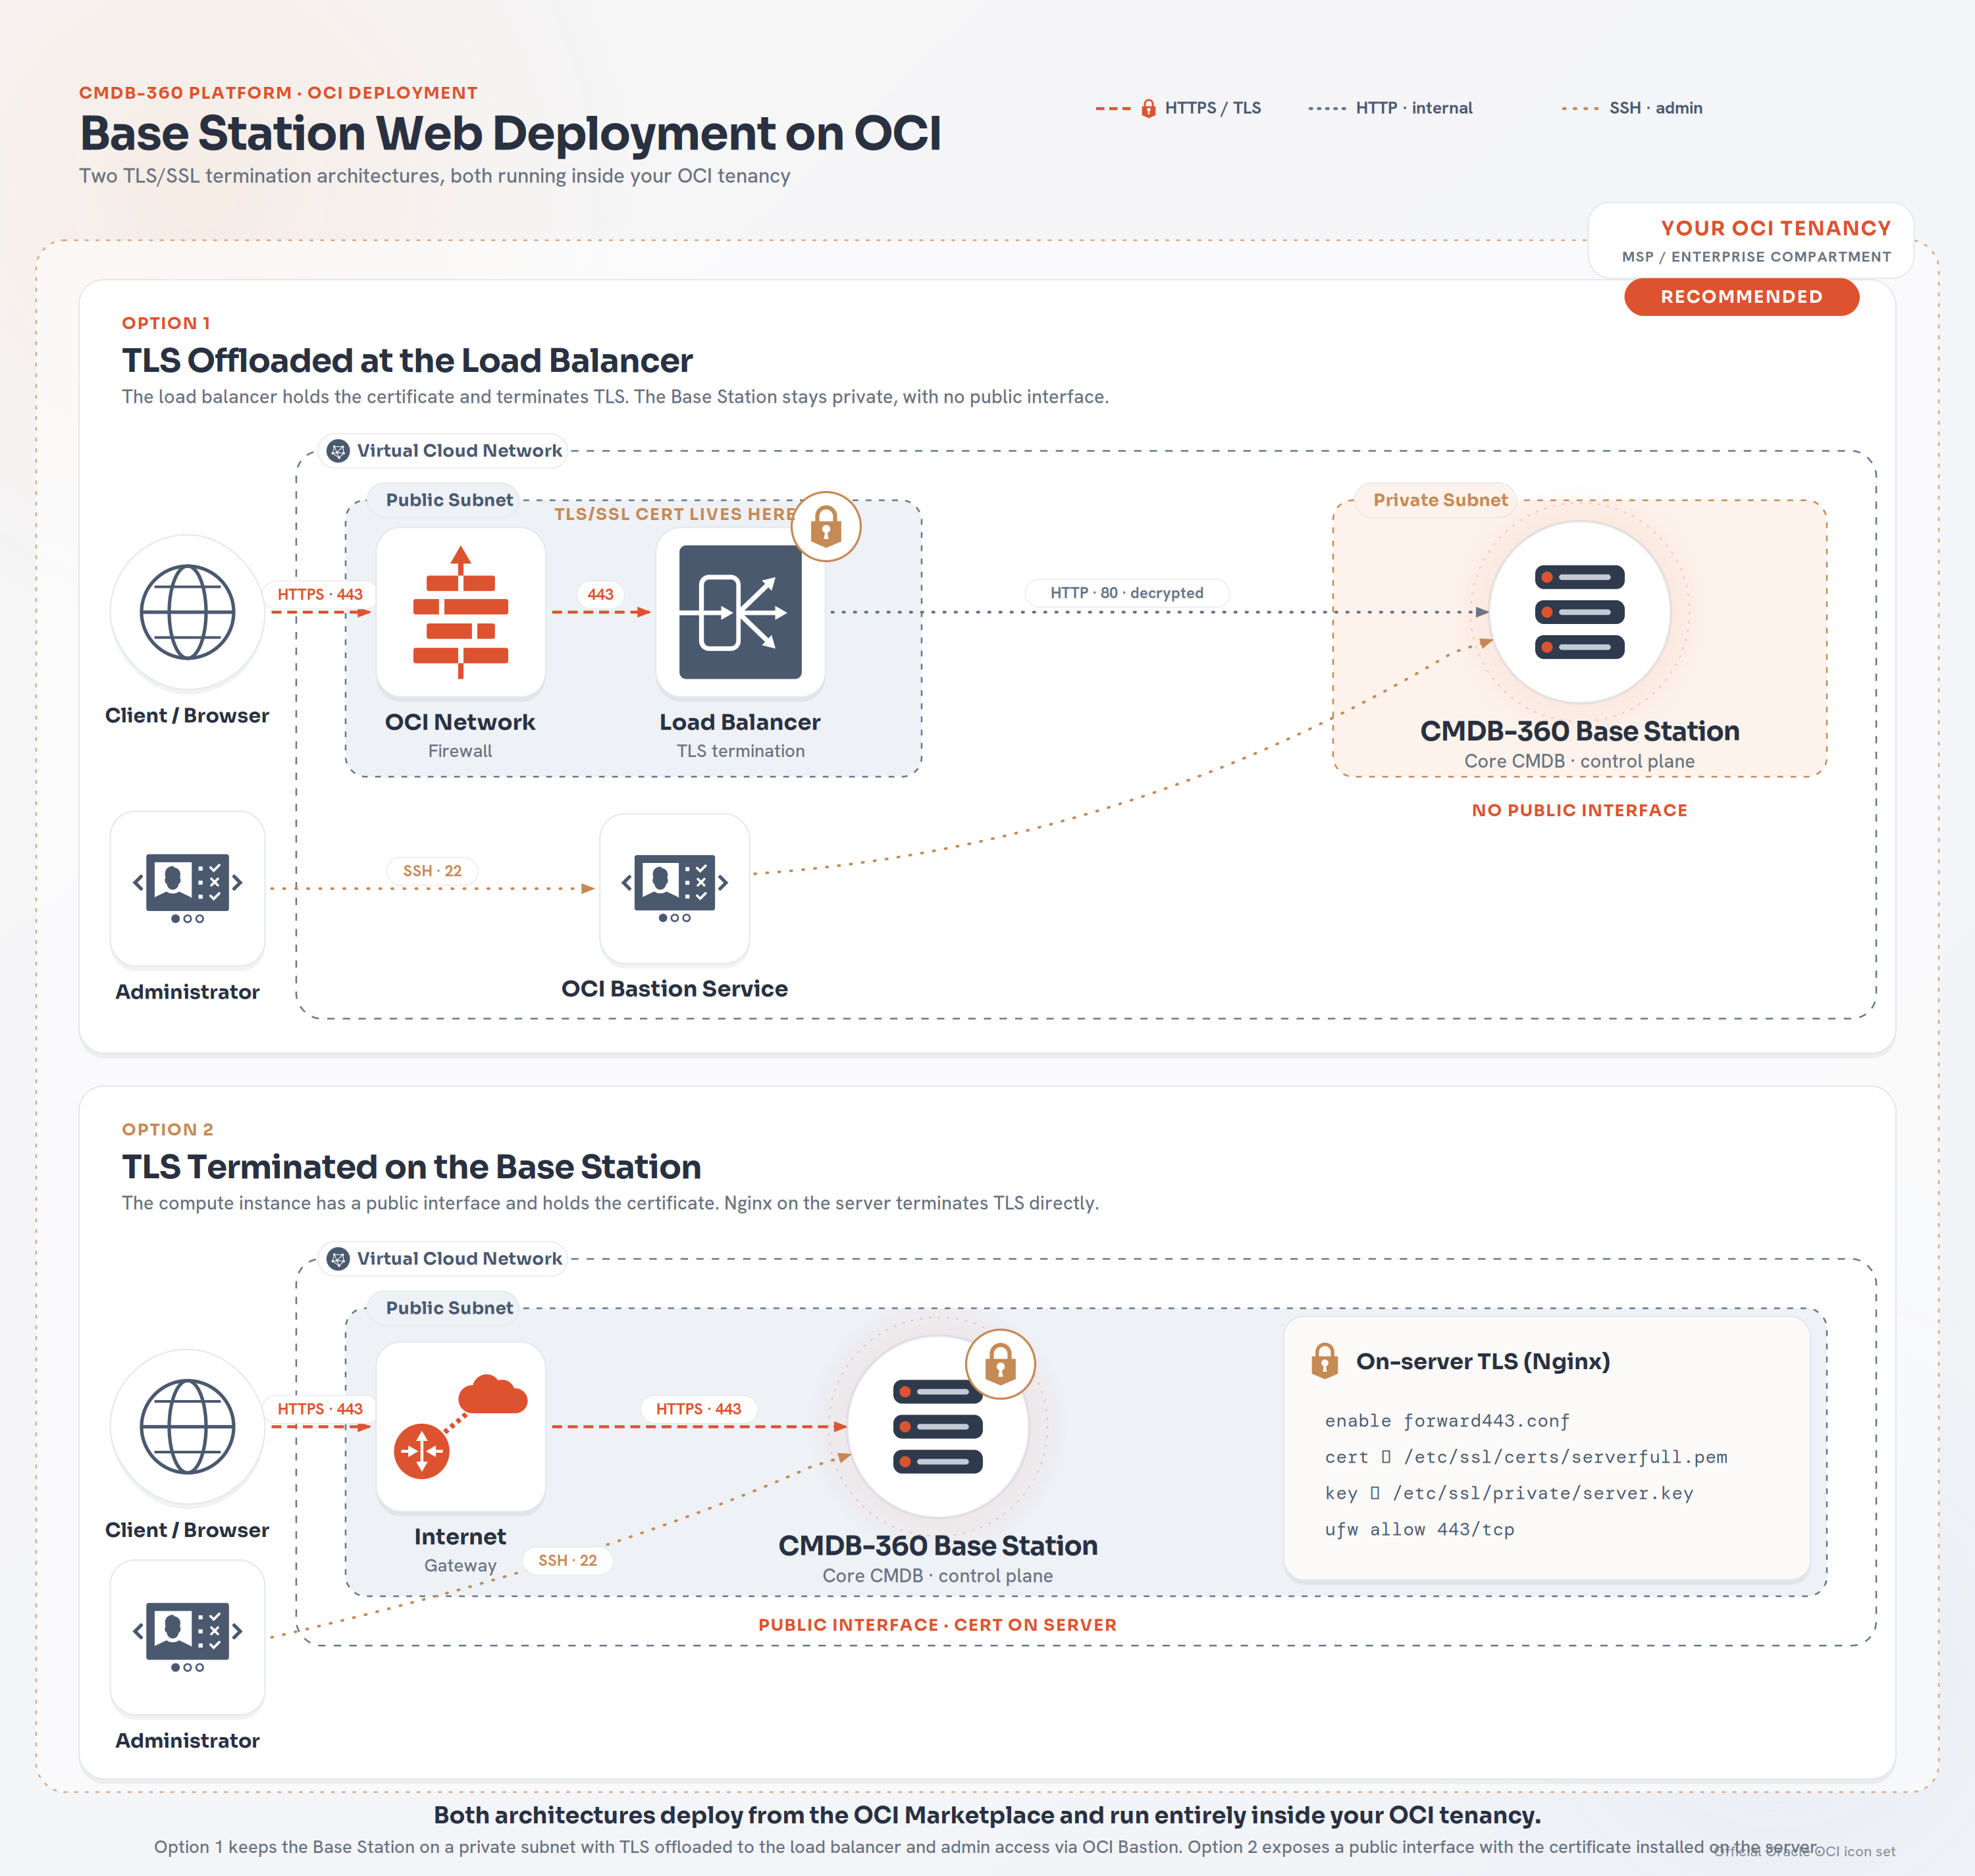
In this document, we will describe how to set up your SSL certificate on the CMDB-360 Base Station (Option 2).
Important
We recommend you use a capable load balancer to handle TLS/SSL traffic to your CMDB-360 Base Station. This will allow you to use the power and flexibility of modern load balancers to handle any security and logging needs. This will also prevent you from adding direct public networking access to your CMDB-360 Base Station.
Note
In order to perform the following tasks, you will need to have console/SSH access to your CMDB-360 Base Station server with root/sudo permissions.
# Configure Nginx to Accept Secure Web Traffic
The CMDB-360 Base Station utilizes Nginx to proxy web traffic to the local backend web server. You may configure Nginx to accept use your SSL certificates to decrypt this traffic before passing it along to the local backend web server. First, you will need to enable the proper configuration on your server:
cd /etc/nginx/conf.d
You should see two pre-configured files prefixed with “forward”. You will need to enable the configuration to allow port 443/tcp traffic.
Note
Please note, you may change the default HTTPS port from 443/tcp by changing the “listen” directive inside the forward443.conf file described below and by updating the firewall port number to the desired port.
sudo mv forward443.conf.off forward443.conf
# Upload Your SSL Certificate and Private Key
To configure your CMDB-360 Base Station server, you must upload the private key that is associated with the SSL certificate that was issued by a known certificate authority along with the issued SSL certificate in PEM format.
Once you have copied your private key and certificate to your server, copy them to the proper destination directories (these are defined in your nginx forward443.conf file). Make sure the key is owned by the root user and has permissions 644:
sudo cp your_private_key /etc/ssl/private/server.key
sudo chown root:root /etc/ssl/private/server.key
sudo chmod 644 /etc/ssl/private/server.key
To copy your issued SSL certificate:
sudo cp your_certificate.pem /etc/ssl/certs/serverfull.pem
sudo chown root:root /etc/ssl/certs/serverfull.pem
sudo chmod 644 /etc/ssl/certs/serverfull.pem
We are naming our certificate “serverfull.pem” since that corresponds to the name defined in the nginx forward443.conf file. You may change this name as you like but please make sure to also change it in the nginx forward443.conf file.
# Certificate Chains (Intermediary Certificates)
If you have multiple certificates that form a single certification chain (ie, intermediate certificate authority certificates), you must include all of these certificates in one file in the correct order (and in PEM format) in your serverfull.pem file.
To create a consolidated certificate file that includes the intermediate certificates, simply concatenate the files using a command like the following:
cat your_ssl_certificate.crt intermediate_ca_cert.crt >> serverfull.pem
# Testing and Restarting Nginx Service
Ensure your nginx configuration is correct by testing it as shown:
nginx -t
After making any changes to your nginx configuration, you must restart the service as shown:
sudo systemctl restart nginx
# Allow Traffic Via Local Firewall
By default, your CMDB-360 Base Station server will allow traffic on ports 22/tcp and 80/tcp. You may view the current status of the firewall using the “ufw status” command or by adding the numbered parameter as shown:
# sudo ufw status numbered
Status: active

     To                         Action      From
     --                         ------      ----
[ 1] 22/tcp                     ALLOW IN    Anywhere
[ 2] 80/tcp                     ALLOW IN    Anywhere
[ 3] 22/tcp (v6)                ALLOW IN    Anywhere (v6)
[ 4] 80/tcp (v6)                ALLOW IN    Anywhere (v6)
In order to allow direct HTTPS traffic to the server, you will need to open the 443/tcp port (or other desired port) using the local firewall. You may do this using the ufw command as shown:
# sudo ufw allow 443/tcp
Rule added
Rule added (v6)
# Disabling Insecure Traffic
There are two steps you may take to disable insecure traffic. First, you can remove the loading of the insecure nginx forwarding rule as shown:
sudo mv forward80.conf forward80.conf.off
Make sure to test and restart the nginx service as described above.
Next, you should remove the firewall rules that allow the traffic thought the firewall. Using the “ufw status numbered” command, simply delete the rules that allow the insecure traffic – for example:
# sudo ufw delete 2  (or the proper number - this is just an example)
Deleting:
 allow 80/tcp
Proceed with operation (y|n)?