# Satellite Installer
Any CMDB-360 Satellite may be installed onto a compute resource using one of the installer utilities described in this document. There are other methods of deploying or installing Satellites, such as cloud marketplaces or Docker, however the Satellite installer method can be used universally to install a Satellite onto any compute resources such as a virtual machine or bare metal.
The Satellite installer utility is available in a graphical installer and a non-interactive installer which can be used in scripts and with other automation platforms such as Ansible. Satellite installers may be used to install a compute resource running Linux in x86_64 or aarch4 format (the installer of the same architecture must be used).
# Supported Linux Operating Systems & Platforms
The Satellite installer utilities are supported on the following Linux operating systems / platforms:
- Oracle Linux 8 (ARM and x86_64)
- Oracle Linux 9 (ARM and x86_64)
- Ubuntu 20.04 (ARM and x86_64)
- Ubuntu 22.04 (ARM and x86_64)
# Downloading Installer
To get started, simply download either the graphical installer (Installer.
https://control.cmdb360.com/downloads/Installer.x86_64
https://control.cmdb360.com/downloads/Installer.aarch64
https://control.cmdb360.com/downloads/AutoInstaller.x86_64
https://control.cmdb360.com/downloads/AutoInstaller.aarch64
You may place the installer in the home directory of your user when you login to your compute virtual machine.
Make sure the download is executable:
chmod +x Installer.x86_64
# Always Run As Privileged User (root or sudo)
Installers must be run as either root or by using sudo. To run the graphical installer for example:
sudo ./Installer.86_64
# Graphical Installer
Executing the graphical installer (Installer.
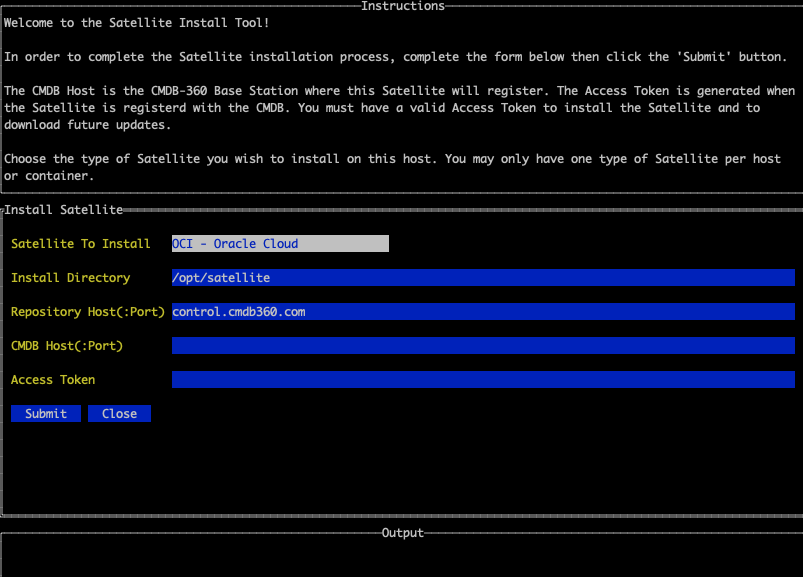
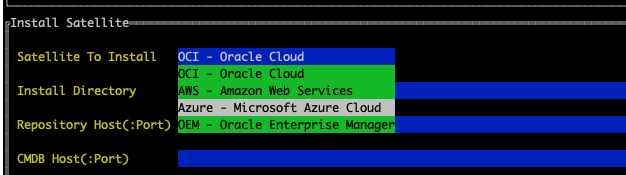
Choose the Satellite type to install by tabbing to the drop down menu and selecting from the options presented:
Next choose the target Installation Directory (default is /opt/satellite) and then enter the host for your CMDB-360 Base Station (and port if it is not the default SSL port of 443).
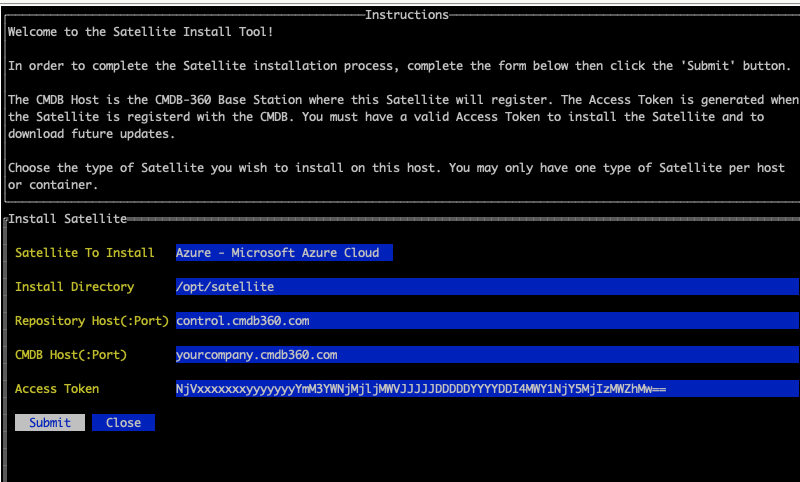
Finally enter the Access Token shown in the CMDB-360 Satellite overview screen or provided by your CMDB-360 administrator.
Click the Submit button to start the installation process. You should see the Submit button change to display “Working…” as shown below:

Please wait will the satellite tools are downloaded and installed. Depending on your Internet connection, this process may take 2 to 5 minutes. You will receive any output or errors in the Output section.

Once complete, simply tab to the Close button and Enter. Next reboot your system and your new satellite should be fully functional.
sudo reboot
# Non-interactive Installer (for scripting)
The non-interactive Satellite installer utility allows for you to install satellites using scripting or other automation platforms such as Ansible. The options for the non-interactive installer are as shown:
Usage of ./AutoInstaller.aarch64:

  -control string
    	Control / Upgrade Host:Port (if not 443) (default "control.cmdb360.com")
  -dir string
    	Installation Directory (default "/opt/satellite")
  -token string
    	Security Token For Account
  -type string
    	Type of Satellite To Install - oci, aws, azure, oem
  -url string
    	CMDB Base Station Host:Port (if not 443)
  -verbose
    	set verbose mode for debug
The following is an example OCI satellite install command call:
./AutoInstaller.x86_64
	--type=oci \
	--token=NjVxxxxxxxyyyyyyyYmM3YWNjMjljMWVJJJJJDDDDDYYYYDDI4MWY1NjY5MjIzMWZhMw== \
	--control=yourcompany.cmdb360.com \
	--url=dev.cmdb360.com
Once complete, reboot your system and your new satellite should be fully functional.
sudo reboot
# Checking Satellite Service Status
In order to verify the core tools of your Satellite are running properly, you may run the supervisorctl utility as shown below (as a privileged user):
sudo supervisorctl status all

You should see output like the following:

Channel                         BACKOFF   Exited too quickly (process log may have details)
Scheduler                       RUNNING   pid 9879, uptime 0:00:21
Updater                         RUNNING   pid 9880, uptime 0:00:21
All programs should be showing RUNNING in order for the satellite to be functioning properly. As you can see, the previous command shows an issue with the Channel utility (which connects the Satellite to the Base Station).